Smaplux - Online Accounting Software
Settings
Settings
Business Settings
Business Settings allows you to set some of the common business-related information.
Here you can change:
- Business name
- Start Date
- Set Default Profit margin
- Currency
- Timezone
- Logo
- Financial year: For some countries, the financial year starts from January and for some it stars on April. Here you can set the appropriate option for your country.
- Tax information
- Product SKU prefix: Enable this feature to generate a prefix for Product SKU. Once enabled, while adding a new product the SKU field with add this prefix along with the input given or if left empty will autogenerate a value along with this prefix.
- Default Sales discount
- Default Sales tax
- Business Setting > Contact > Default credit limit: The credit limit provided here will be used as default value when creating a customer or supplier
- Business Setting > Sale > Default Sale Discount: The default discount will be used for all sales in POS & Add sales screen.
Sales:
Sales Item Addition Method:
- It has 2 options: “Add item in new row” & “Increase item quantity if it already exists”
- This option is related to POS & Sales screen when a new product is added.
- Add item in new row: It will always add a product in new row
- Increase item quantity if it already exists: If the product already exists in the cart it will increase its quantity else it will add it in a new row.
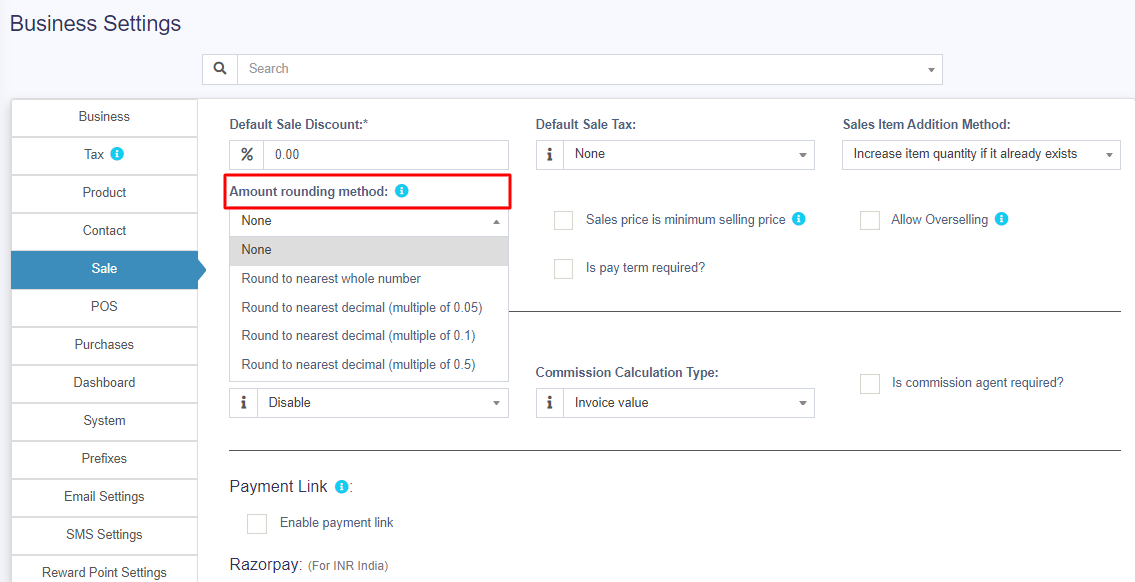
Amount rounding method:
The price of the products can be taken as a whole number or as a rounded decimal value by selecting the particular roundoff method. If none is selected the value is taken as a whole number.
Sales price is minimum selling price:
If this option is enabled then the product cannot be sold at a price lower than the selling price set for the product.
It can be sold at a higher price but not at a lower price.
Enable inline Tax:
To display the price inc. tax on the POS screen, kindly enable the check box in the Business Settings->Tax.

Enable Sales Order:
This will enable the sales order feature.
Default Sale Discount:
The default sale discount can be added to products in Business Settings -> Sale

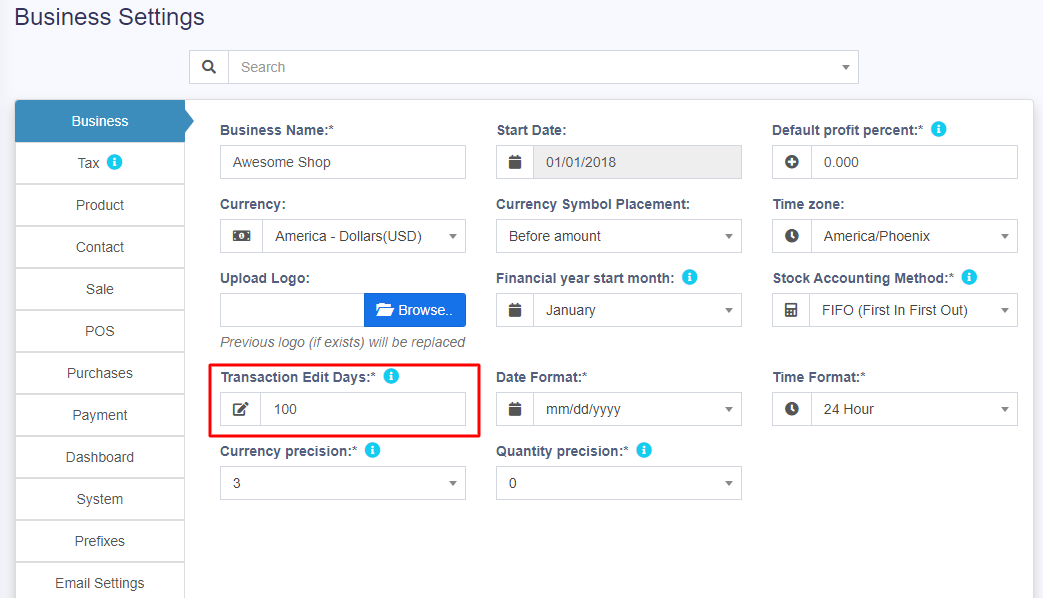
Limit for Transaction Edit:
How to edit transactions for more than 30 days?
In order to increase the limit for editing the transaction, set the number of days in the business settings.
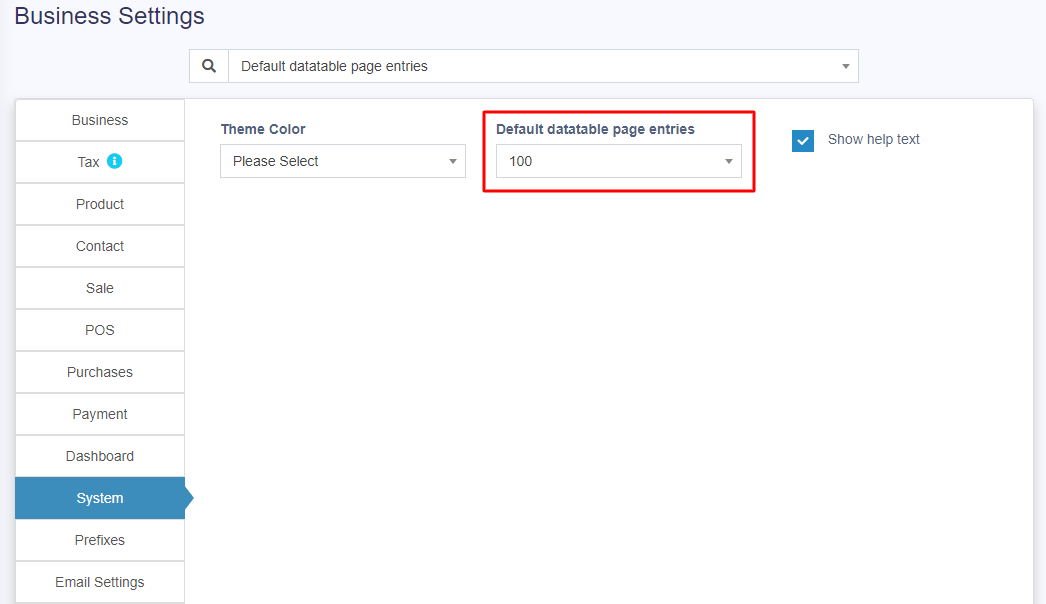
Datatable Entry Selection:
The default number of entries in the data tables can be selected in Business Settings -> System.
Allow Overselling of Products:
In some cases, the products need to be sold even when they are out of stock. In such cases, you can enable the “Allow Overselling” Option from the Business Settings > Sale.
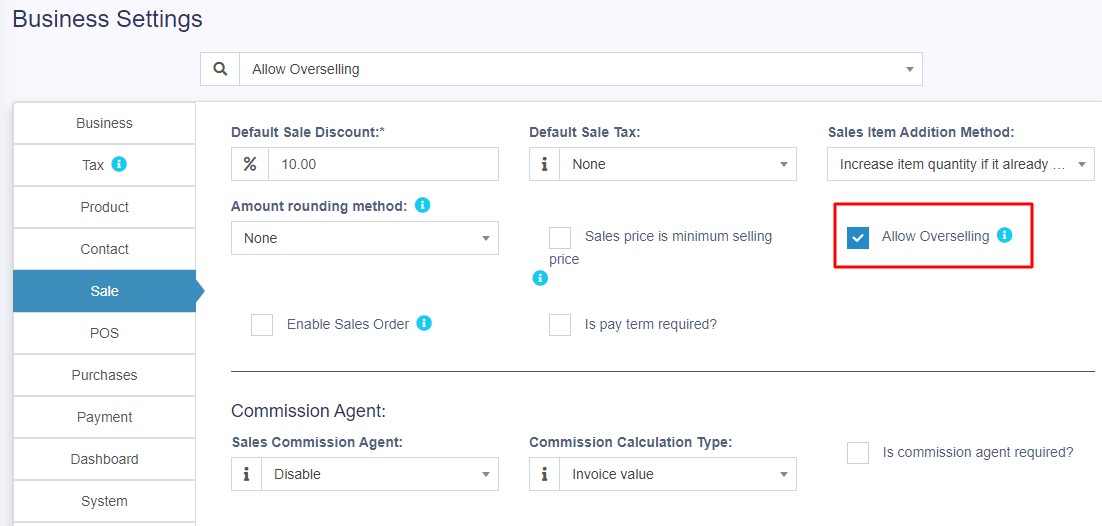
This will allow you to add sales for non-stock products.
NOTE: If the sale is added for products that are out-of-stock using the Allow Overselling Option, then the profit will be calculated as negative for those products.
Setting default Language, Changing Language preference and Adding/Editing Translations
Setting default System Language
By default, system is configured to work in English. But you can change the default language. To change the default language follow the below steps:
- Open .env file
- You will find a configuration “APP_LOCALE=en” below APP_URL. If you don’t find it then add the configuration APP_LOCALE=en below APP_URL
- Change the value of the above key to your desired language as per the list given below
‘en’ => ‘English’,
‘es’ => ‘Español – Spanish’,
‘sq’ => ‘Shqip – Albanian’,
‘hi’ => ‘हिंदी – Hindi’,
‘nl’ => ‘Dutch’,
‘fr’ => ‘Français – French’,
‘de’ => ‘Deutsch – German’,
‘ar’ => ‘Arabic – العَرَبِيَّة’Or if you have added a new language then add the language ISO code.
Changing your Language Preference
To change your display language go to “Profile -> My Profile -> Language”
Select the language you want to use and save it. This will change all texts to your preferred language.
Editing existing translations
Sometimes the translations can be improved to make it better understandable.
- To edit existing language translations – go to
resources/lang/{language_iso_code}/ - For modules: To Add/Edit transactions go to Modules/{Module_name}/Resources/lang/{language_iso_code}
- Here you will find files almost grouped based on the pages. Edit the string you want to change and save it.
- If you make improvements to the language file, please do share it with us. We will update it the codebase so that it is useful to others too. Email: thewebfosters@gmail.com
Translate language for login or register interface
Go to config/app.php and change the value of “locale” to the specified language iso code.
Adding new language
- Create a new directory for the language inside “/resources/lang/”. Name of directory should follow language_iso_code
- Copy the files from
/resources/lang/en/to the directory you created. - Open the individual files, translate and save it.
- Go to
public/js/lang. Create a new file with name “.js”, copy all content from en.js and add corresponding translations. - Open
config/constants.phpand add the new language in the “langs” array. - If you add any new languages, please do share the files with us. We will include it in our updates. We will acknowledge you for adding any new language. Email us at: thewebfosters@gmail.com . Thank you in advance.
Adding a new Label or barcode settings
Smartbook ERP comes with some commonly used barcode configurations for you our-of-box. If your barcode configuration isn’t covered then you can easily create a new configuration.
You must have all measurement details of the sticker to create a configuration. All dimensions need to be in inches.
Adding Barcode sticker settings
- Go to settings -> Barcode Settings -> Add
- Enter a descriptive name of the setting. Add some description for your information.
- If you’re using a Roll, then check the “Continous feed or rolls” checkbox.
- Enter Additional top margin (In Inches), Additional left margin (In Inches), width of the sticker, Height of the sticker, Paper width, Paper height, number of stickers in one row, distance between 2 rows, distance between 2 columns and the total number of stickers per sheet.
- Some of this informations are not needed for Continous feed or rolls.
You must test you setting by printing a dummy sticker in Purchase – print label option. If something seems wrong then edit the measurement accordingly.
Changing Application/theme Color
To change Application or Theme color follow the below steps:
- Go to Settings -> Business Settings -> System (tab)
- Change the Theme Color to your desired color. A total of 11 colors (Light & Dark options) are given
Changing the custom fields labels
To modify the labels of custom fields, go to Settings -> Business Settings -> Custom Labels
Here you can give names to all custom fields.