Smaplux - Online Accounting Software
Sales Management
Sales Management
Sales Order
Sales Order is a document given by the supplier to the buyer against a Purchase Order by the buyer.
A sales order contains the buyer invoicing details, delivery details, products, quantities, pricing, tax, discounts, payment terms, payment details, shipping charges if any, and other notes.
Once the buyer agrees on the sales order, goods are shipped by the supplier.
Sale order has multiple statuses: Ordered, Partial, Completed
Enabling Sales Order:
To enable Sales Order, follow the below steps:
- Go to Settings -> Business Settings
- Sales tab -> Enable Sales Order
- Save it.
Using Sales Order in Smartbook ERP
Creating sales order
After Enabling sales order, inside Sales you’ll find the Sales-Order menu.
Go to add sales order, fill in all the details and save it.
Stocks are not deducted for sales orders.
Once a sales order is created you can print it and send it to the buyer for approval.
Converting Sales Order to Sales:
On approval of sales orders, you can create sales from the sales order.
- Go to Sales -> Add sales, select the business location & Customer.
- On Selecting it will populate the list of all sales orders related to the customer on the “Sales Order” dropdown.
- Select the Sales Order and it will auto load the products for that order with the product’s price, tax, discounts applied automatically as the sales order.
- You can increase or decrease the quantity.
Selling Products, Changing Product Price, Tax & Discount, Lot number & Expiry
Go to – Sell -> POS
Selecting Customer:
y default, there is “Walk-In Customer”. You can search for a customer by name/customer id or phone number or can add new customer by clicking the plus (+) button “Add Customer”.
Searching & Adding Product:
Enter Product Name Or scan the barcode to search the product. If multiple products are matched then it displays the dropdown of products, selects the product from it. Or if there is a single product then it directly gets added to cart.
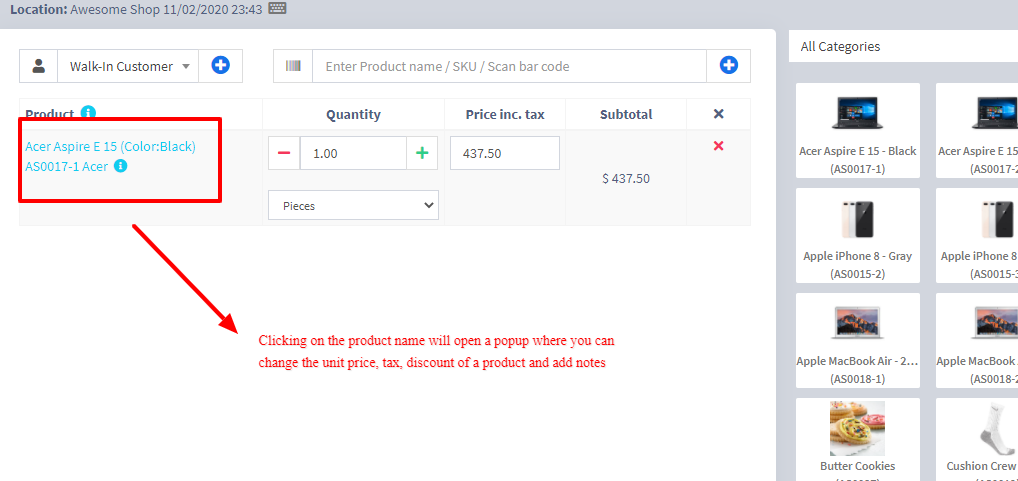
Changing Product Price, Tax & Discount for a product
- After the products get added, click on the product name to modify product price, tax & discounts.
NOTE: Option for different tax in products will be shown only if online tax is enabled. You can enable it from Business Settings -> Tax -> Enable Inline Tax in purchase and sell
Selecting Lot number for a product:
- If lot number is enabled then it will show the option to select lot number. (Enabling Lot number)
Selecting Expiry for a product
- Expiry Date: If the expiry date is enabled then it will show the option to select lot number. (Enabling expiry)
Cancel Sales:
To cancel the sales click on the cancel button. Cancel invoices are not saved in the system, so no stock will de deducted.
To finalize the invoice click on Finalize – Add the payment options and save it.
On save it will display an invoice printing option.
NOTE: For invoice to print correctly – The Margins options should be set to “Default”.
List of sales can be viewed from Sell -> List Sales.
List of drafts can be viewed from Sell -> Drafts.
Both Sell & Drafts can be edited to make any changes.
Express Checkout: Express Checkout means the sale will be marked as Paid and the payment method will be cash. No separate payment screen will be displayed. Printing of invoice depends on the business location settings.
100% Credit Sales
- To sell on credit to the customer you first need to enable this button by going to Settings -> Business Settings -> POS -> Show Credit Sale Button
- Then on the POS screen, you will be able to see a button “Credit Sale”, simply click this button to make sales on credit.
Half Credit & half payment Sales:
Suppose invoice amount is $1000, customers pays $700 cash and $300 is credit amount on him, then follow these steps:
- Click on multiple pay button
- Select the payment method and enter the amount paid by the customer. ($700 in our example)
- Click finalize payment.
- Now, the pending amount is automatically added as credit amount on him (or amount to be taken from the customer)
Previous sale amount in Sales:
If a sale is made for the customer for a subsequent time for the same product, the previous amount in which the product is sold will be shown for reference in add sale screen.

This feature can also be used for purchase of same products from a supplier.
NOTE: This feature is available in version 4.7.8 and above
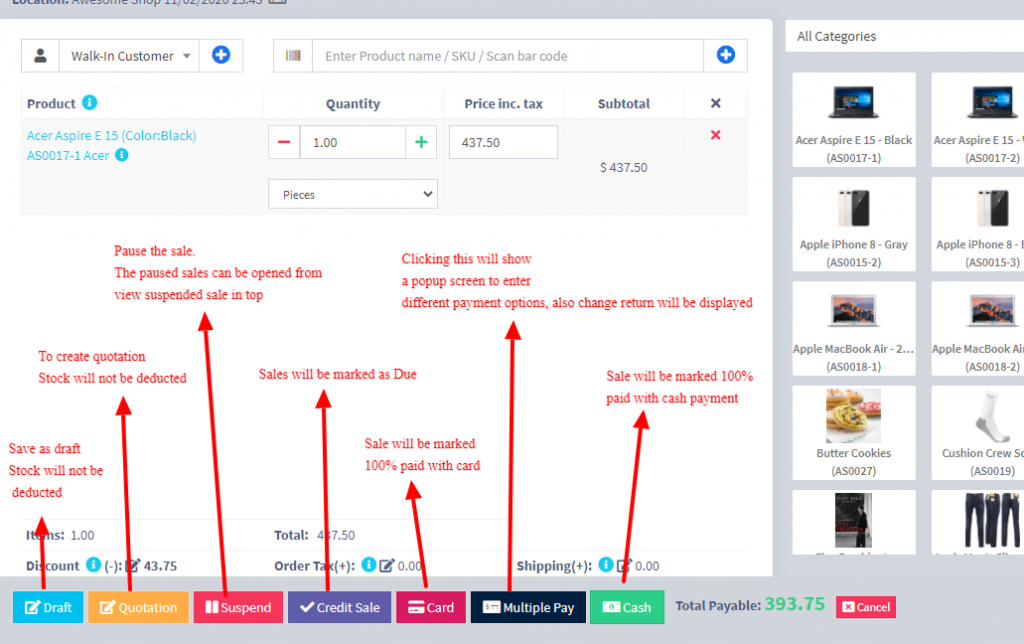
Draft & Quotation
This is useful if you want to create a quotation before sales.
Marking a sales as Draft or Quotations will not deduct the available stock.
You can view all Quotations & Drafts from List Quotation or List Draft respectively. Existing draft/Quotation can be edited to make it as final sales.
Convert Draft/Quotation to Sale invoice:
To convert a draft/quotation to sale invoice, follow the steps below
Go to List draft / List quotation. Click on the action button.
Select edit in the dropdown.
Change the status from draft/Quotation to Final and save it.
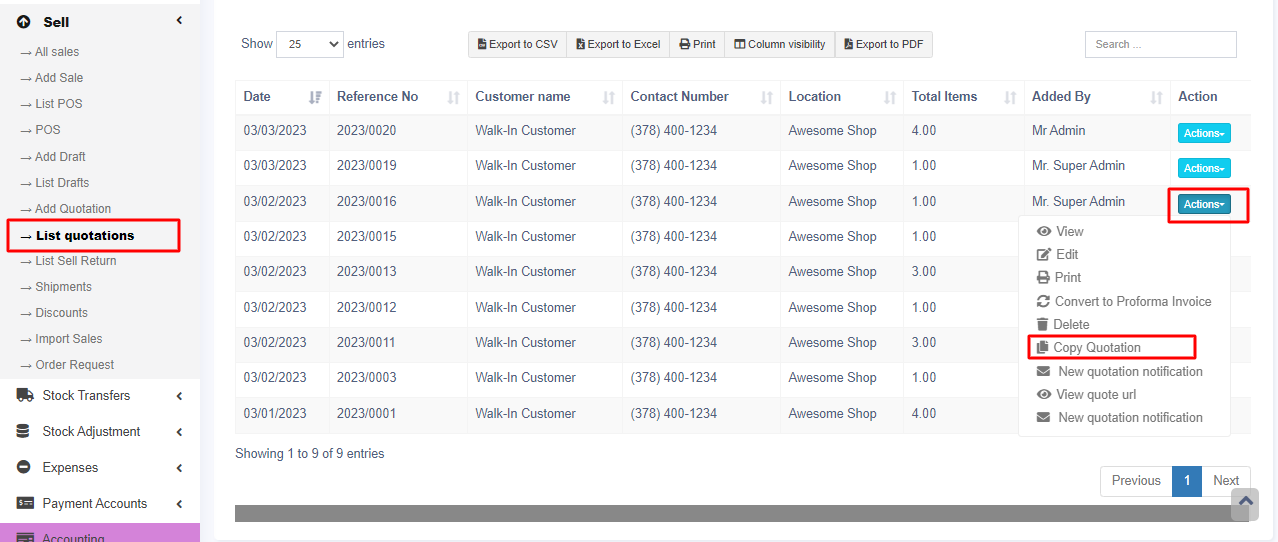
Copy Quotation:
Quotations can be copied or duplicated.
Go to Sale > List Quotations > Actions > Copy Quotation
Suspended Sales
Suspend Sales means unfinished sale or hold Sale.
Suspended sales stock gets deducted from available stock. You can view all suspended sales by clicking on the Yellow Color button present in very top right of screen (above the date).
Some Use Case of Suspended sales
- In a grocery store, if you have suspended button, you can suspend particular customers sales and entertain another customer, when his comeback you can proceed with his sale.
- In Restaurant, you can suspend the order of customers if not yet paid, and finish it when they finish eating and paid their order, so you can proceed to final sales. You can put Table 1, Table 2, Table 3… so when they finish it’s easy to identify table 3 going to pay.
- In hotel lots of customers check in stay for 2 nights and order some foods and customers say, just charge to room 024. So you can suspend their orders and edit if there is some additional order and suspend again. Until final it when they pay their bills. on Hotel, on Reference Number: Room 009, Room 012
Card / Multiple Pay / Cash
- MultiplePay: Used when the customer wants to pay with different payment methods like some amount by card, some by cash and some other payment methods. This option is also used when the customer doesn’t pay the exact tender amount and you need to calculate the Return Change.
- Card: Used when the customer wants to pay the complete invoice by card.
- Cash: Used when customer pay the exact amount of invoice by cash. If the customer pays less or more amount then the invoice amount then use Multiple Pay to get change return.
Adding payments from Contact
Go to contact -> Suppliers. Click on actions for the supplier and it will show “Pay Due amount”, click on it and pay the amount. “Pay Due amount” this option is not displayed if there is no payment due.
Adding/Editing Payment Method or Pay-Via
Follow Add/Edit Pay-Via / payment method.
Rounding Mechanism for total Sales amount or total payable
Rounding helps to round the total payable to nearest currency exchange available.
To enable rounding go to Settings -> Business Settings -> Sales and choose the Amount rounding method
Amount rounding method
- Round to nearest whole number: It will round the paybale value to nearest whole number. For example 1.49 will be rounded to 1.00, and 1.51will be rounded to 2.00
- Round to nearest decimal (multiple of 0.05): It will round the paybale value to nearest decimal number which is multiple of 0.05. For example 1.49 will be rounded to 1.50, 1.51 will be rounded to 1.50, 1.59 will be rounded to 1.60, 1.54 will be rounded to 1.55
Similary all other round to nearest decimal number works as per the multiplier.
Tender Change or Change Return
Suppose during POS the total payment amount by a customer is $250, but the customer pays $300 cash.
In this case, the cashier needs to return $50 cash to the customer.
So, enter all these details in the system, follow the below steps:
- Click on the “Multiple Pay” button. It will open a popup
- Enter the paid amount by the customer ($300 here)
- On the right side, it will show a “Change Return” Amount. This amount needs to be returned to the customer
- Click on finalize button to save the sales.
The change amount is shown in the invoice. To create a custom label for change return Go to Settings -> Invoice layout change the ‘change return label’ to a required label and save the changes.
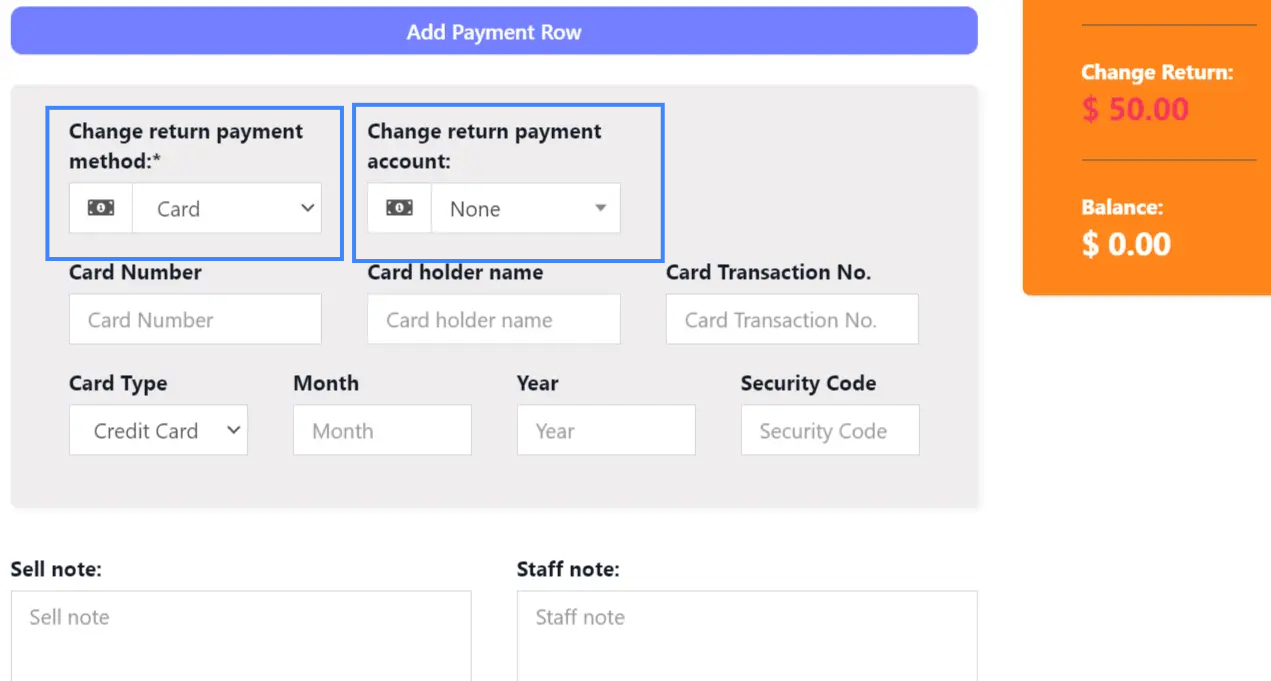
Changing Payment Method and Payment Account while Adding a Change Return:
While you are adding a sale where the customer is paying an amount greater than the invoice amount, you can return the balance amount either through cash, card or any other payment method.
To add the payment method/payment account for change return, you can select the payment method/payment account in the Change return payment method and payment account dropboxs in the POS screen.
NOTE: This method can also be used while adding a sale return by editing an invoice. For more details check -> Sale_Return/#First-way
Featured Products for POS screen
Adding featured products helps you quickly access some products which are frequently or most commonly sold.
To add featured products follow these steps:
- Go to Settings -> Business Locations.
- Add/Edit any business locations
- In add/edit screen you can select multiple products that can be featured in pos for this location.
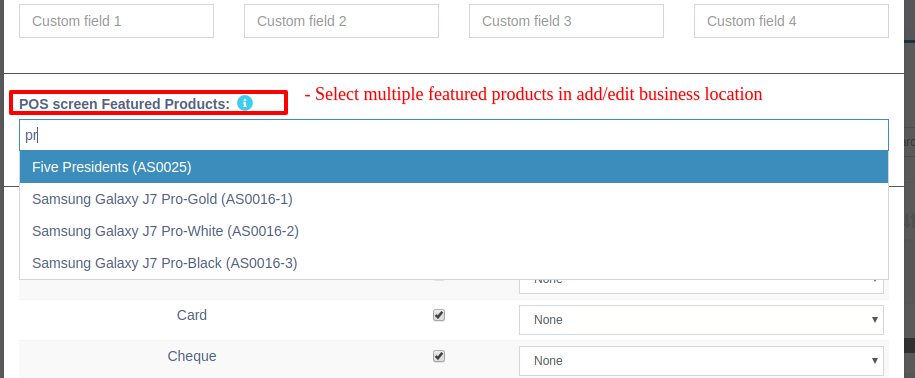
Select feature products in add/edit business location
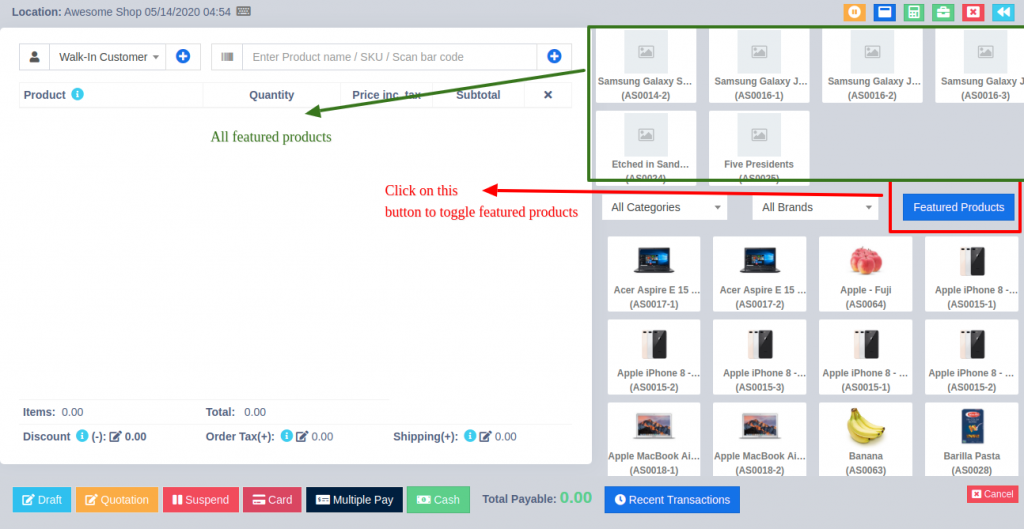
Featured products in pos screen
Using Smartbook ERP for Selling of Services
Smartbook ERP can be used:
- Exclusively for Services or
- Exclusively for Product Selling (trading) Or
- Combination of Services & selling of Products.
Selling Services
Services are Intangible products.
Example: Repairing, Salon & Spa services, Web Development, Accounting, banking, cleaning, consultancy, education, insurance, expertise, medical treatment, transportation and a lot more.
- To add service Go to Add New Products.
- Add the name of your Service, Like Computer Repair, Accounting, E-Commerce Development, Consulting, Plumber, Saving, Hair Cutting, etc.
- While adding service-based products uncheck the “Manage Stock?“ option. When Manage stock is unchecked or disabled the stock for such products is not managed, because such a product doesn’t have a stock count with it.
- Purchase Price: Add anything to the purchase price, it can be 1 or 0, or something else. The purchase price is of no use in service.
- If you want to add a description for such service like for example in computer repair you want to describe the problem for such service then check the “Enable Product description, IMEI or Serial Number” checkbox.
Now to create invoice or receipt for such service
1. Go to Add Sales or POS screen.
2. Enter the name of the service.
3. If you have enabled “Enable Product description, IMEI or Serial Number”, then it will show you a popup to add a description. If you haven’t enabled description you can click on the button as shown the image below.
4. To print the description in the invoice, go to Setting -> Invoice Settings -> Invoice Layout. And click on the layout you’re using. Enable “Show sale description“. And Click on “Update” to update the invoice layout.
Now it will display the Description you entered on the invoice or receipt.
Sales Return
There are 2 ways of adding sales return
First way:
Edit existing invoice for the sales by going to edit the invoice and remove the product or reduce the quantity of the product. And save it. The system will automatically add the returned quantity back to stock. This is a simple & recommended way of doing.
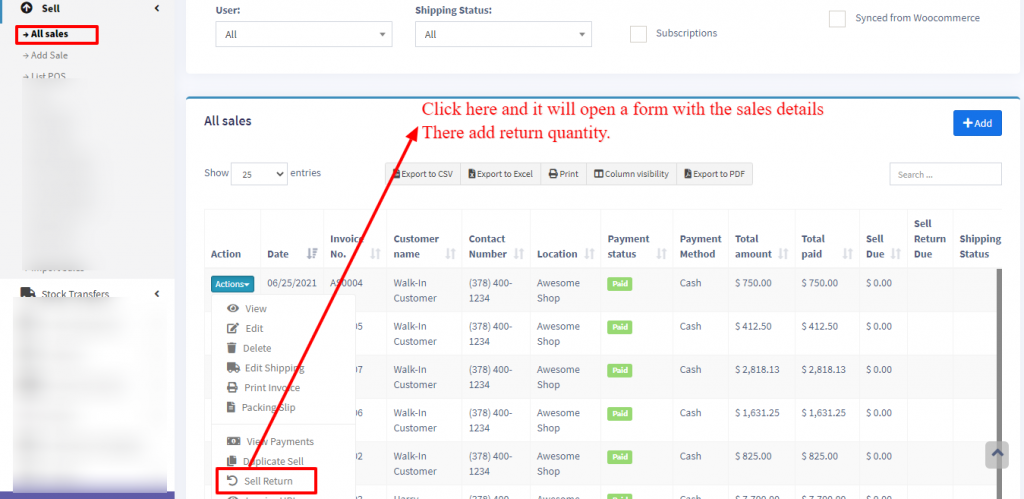
Second Way:
Follow the screenshot below
Question: Will selling return value not decrease the payment value from the parent invoice?
- Smartbook ERP will adjust these values in the Profit & Loss report.
- Regarding payment, users have to add a transaction for receiving payment from the customer and then paying them back. This way all the transactions are recorded.
Enabling sales Subscriptions:
To enable subscription, go to Modules -> Check the “Enable Subscriptions” and save it.
IMPORTANT: For subscription invoice to auto-generate cron job must be set up.
Using Subscriptions:
- Subscriptions can be added from both POS sales or normal Sales screen.
- In POS or sales screen to add a subscriptions click on “Subscribe?” Checkbox
- On clicking subscribe it shows a popup modal, enter the subscription frequency like every 1 day or every 5 days or every 1 month etc. Also enter the subscription frequency, like if a user wants so subscribe only 5 times the enter 5, for unlimited leave it blank.
- All subscriptions appear in Sell -> Subscriptions screen. From here you can also start/stop a subscription.
- When a subscription invoice is auto-generated then a notification is sent to admin & sales person.
Subscriptions Indicators:
While adding subscription sales, the sales will be marked with an indication in the “All Sales” screen.
This indicator will be in either of two colors, blue or red.
The indicators represent
1. The blue color indicates that this is an automatically created subscription invoice.
2. The red color indicates that it is a recurring invoice that repeats for a specified number of times and turns to the blue color invoice when the number of times specified is reached.
Cash Register
- Cash Register gives you an overview of a particular user/cashier session
- Whenever a cashier opens to POS screen she must Open Cash Register by entering the “Cash In hand”
- If the cashier has access to more than one location then location also needs to be selected (Added in Smartbook ERP V 2.19)
- Every sale made by the cashier will be logged into the Cash Register. In POS screen, You can view the Register details by clicking on “Register details” button present in the top navigation bar. It displays the Cash in hand, and cash details by other payment methods as well. Also, the amount refunded by the cashier.
- To close a cash register click on Red Color – Close Register Button. On closing Cash register the cashier will have to enter the details of the Total Cash, Total Card Slips, Total cheques and other fields.
- To view all cash register Go to Reports -> Register Report. Here you view all cash register details.
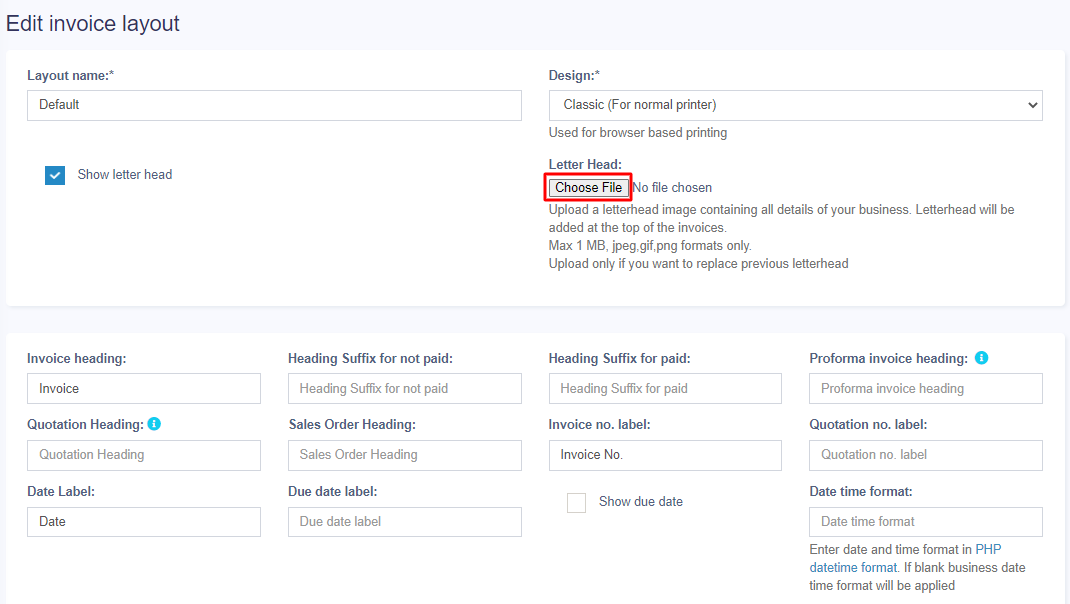
Invoice Layout
Invoice Layout helps you to create different invoice formats.
To add a new invoice layout:
- Go to Settings->Invoice Settings->Invoice Layout->Add
- Give a unique distinguishable Layout name
- Add the text to be shown in the top/header of invoice. Generally, it can be your shop name, aligned center with Heading 1 format.
- Add other relevant details.
- You can show/hide address fields.
- You can mark a layout as default. The default layout is used when no layout is found for a location.
- Click on Save.
To use an invoice layout in a location go to” Business Locations -> Edit” and assign the invoice layout.
Invoice Design:
- In invoice layout, you will find options for invoice designs.
-
Used for browser-based printing only & NOT print server-based printing.
- Slim design is used for thermal line printer-based printer.
Editing invoice layout HTML/CSS/Javascript
To manually change the code for invoice layout the path is: resources/views/sale_pos/receipts/{design_name}.blade.php
Where design_name = name of the design you want to change like classic/elegant/detailed/slim etc.
Tax Summary:
To see the tax summary in invoice, go to add/edit invoice layout, and enter the “Tax Summary Label” option and it will show the tax summary in invoice.
Total in words:
To display total in words in the invoice Enable:
- Show total in words
- Choose “Word Format”
Discounted Price:
To display the discounted unit price and discount amount in the invoice, enable the following filed in invoice layout
- Discounted unit price label
- Discount label
Display unit breakdown
To display the reduction summary of quantity from multiple units, enable the check box ‘show base unit details (If applicable)’.
Display Base and Multiple Unit details:
If you have added multiple units in your system, you can display the relation of the base and multiple units in the invoice.
For example, if 1 dozen = 12 pieces. Then you can display it in the invoice with the price.
To achieve this, follow the steps given below
Step 1: Go to Settings > Invoice Settings > Invoice Layout.
Step 2: Enable the ‘Show base unit details’ checkbox.

Now, if you select a multiple unit the details will be displayed in the invoice.
Adding sale custom fields in the invoice:
The sale custom fields can be added to the printed invoice.
Step 1: To achieve it, Go to Settings > Invoice Settings > Invoice Layout.
Step 2: Select the invoice layout in which you need the sale custom fields to be printed.
Step 3: Enable the checkboxes for the sell custom fields, “sell 1”, “sell2” etc, and save it.
Now, when you use this chosen invoice layout, the custom fields you set up for sales will automatically appear on the printed invoice.
Letterhead:
A letterhead image containing all details of your business(organization name, address, business registration & other details) can be added to invoices.
Letterhead will be displayed at the top portion of the invoices.
- Go to Settings > Invoice Settings > Invoice Layout.
- Enable the “show letterhead” checkbox.
- Upload the letterhead file (Max 1 MB)
Invoice External URL:
- With invoice external URL you can share the invoice to a customer via a link.
- With this link, they can see & print the invoice without they having to login into the system.
- The link can also be sent in Email & SMS notification. To send url in Email/SMS notification add it in notification template using the url tag.
Displaying QR code in Invoice
Steps:
- Edit an invoice layout
- Scroll down to the QR code section at the bottom
- Click Show QR Code
- Enable all the fields required in QR code, like Business Name, Business Name, Invoice URL, and others
- Save the invoice layout. Print an invoice and you’ll see the QR code in the invoice
- Show Labels: Enable this option to show the labels(key-value pair) in QR code
- ZATCA (Fatoora) QR code: This is mostly required in Saudi Arabia country. Enabling this will generate a QR code in LTV-base64 format.
Gift receipt:
A gift receipt shows proof of purchase but leaves out the amount spent. To print a gift receipt follow the below steps:
- Add a new invoice layout with the name “Gift Receipt”
- In invoice layout select the Invoice Design as Slim and Check the Hide all prices checkbox
- In Business Settings -> POS, check the Show invoice layout dropdown and save it.
- Now in the POS screen whenever you want to issue a gift receipt, simply select the invoice layout as Gift Receipt and print the invoice.
Configuring keyboard shortcuts for POS screen
Smartbook ERP supports keyboard shortcuts, by default we have configured shortcuts for different actions in POS screen.
But you can configure it yourself as per your convenience.
To configure keyboard shortcuts, go to Settings -> System Settings. Here in the POS section, you will find a list of Operations and the shortcuts for them.
You can use the Available Key Names with any combination of letters or number to create shortcuts.
– Make sure the shortcuts do not conflict (is not same) with the shortcut of the browser. Making a shortcut same as the browser will have different effects in different browsers.
Add/Edit Discount by Brands,Category or Location:
- Name: Enter a meaning full name for the discount.
- Brand: Select the product brand where it will be applied.
- Category: Select the produc Category where it will be applied.
- Location: Select the location
- Priority: Discount with higher priority will have higher weight, however priority will not be considered for exact matches.
For example: if there are 2 discounts available for the same brand and/or category then the disount with higher priority will be applied. - Discount type: Fixed or Percentage
- Start At: Start date of the discount.
- End At: Start date of the discount.
- Apply in selling price groups: If checked then the discount will be applied in the selling price group price. If not then it will not be applied.
- Apply in customer groups: If checked then the discount will be applied in the customer group price. If not then it will not be applied.
- Is active: Activate or not
Enabling reward points:
- Go to Settings -> Business Settings -> Reward Points Settings.
- Click on Enable Reward Point and it will get enabled.
Reward Points Settings:
Reward points settings is divided into 2 parts:
- Earning Points Settings
- Redeem points settings
Earning Points Settings:
- Reward points display name: This is display or label name for reward points. Some people like to keep it as reward points or reward coins etc. Only used for displaying label.
- Amount spent for unit point: Meaning how much the customer spent to get one reward points.
Example
If you set it as 10, then for every $10 spent by customer they will get one reward points.
If the customer purchases for $1000 then they will get 100 reward points. - Minimum order total to earn a reward: The minimum amount the customer should spend to get reward points.
Example:
If you set it as 100 then the customer will get reward points only if there invoice total is greater or equal to 100. If the invoice total is 99 then they won’t get any reward points.
You can set it as a minimum of 1. - Maximum points per order: Maximum reward points customer can earn in one invoice. Leave it empty if you don’t want any such restrictions.
NOTE: On returning a sale the reward point earned in that sale(invoice) will be reduced automatically.
Redeem Points Settings:
- Redeem amount per unit point: It indicates the redeem amount per point.
For example: If 1 point is $1 then enter the value as 1. If 2 points are $1 then enter the value as 0.50. - Minimum order total to redeem point: Minimum order total for which customers can redeem points.
- Minimum redeem point per order: Minimum redeem points that can be used per invoice. Leave it blank if you don’t need this restriction.
- Maximum redeem point per order: Maximum points that can be used in one order. Leave it blank if you don’t need this restriction.
- Redeem point expiry period: Expiry period for points earned by customers. You can set it in months or years. Expired points will get deducted from the customer account automatically after this period.
NOTE: You must set the cron job for expiry feature to work. Cron Job Document
To display customers remaining reward point in invoice you can choose the option in invoice layout to display it.
Types of service
- Types of service is mostly used in restaurants, it is for example Dine-in, Parcel, Courier, 3rd Party Delivery etc.
- Based on type of service you can change the price of the product by linking types of services to selling price group.
- You can add packing charges (fixed or percentage)
- Also, you can add more information like in custom fields.
Enabling Types of Service:
Go to Settings -> Business Settings -> Modules -> Check the “Types of Service”
and save it.
Adding new Types of Service
- To add, go to Settings -> Types of service -> Add
- Add a name, description
- For each location select the Price Group that will be applicable. Select Default Selling price for selling in default price of the product.
- Enter packing charge, leave empty if not applicable.
- Enable custom field: this will enable some custom fields in type of service in POS screen.
Using Type of Service in POS/sales screen:
- On Enabling Types of service in POS screen you will see the option to select Type of service.
- Before adding a sales select the type of service and enter the relevant details.
- You can show the type of service information in receipt by enabling it from Invoice Layout
Shipments, Home Delivery or parcel management
Adding a Delivery person option for Shipments:
While adding shipment details during a sale, the delivery person can also be added.
NOTE: This feature is available in Smartbook ERP version 5.2 and above
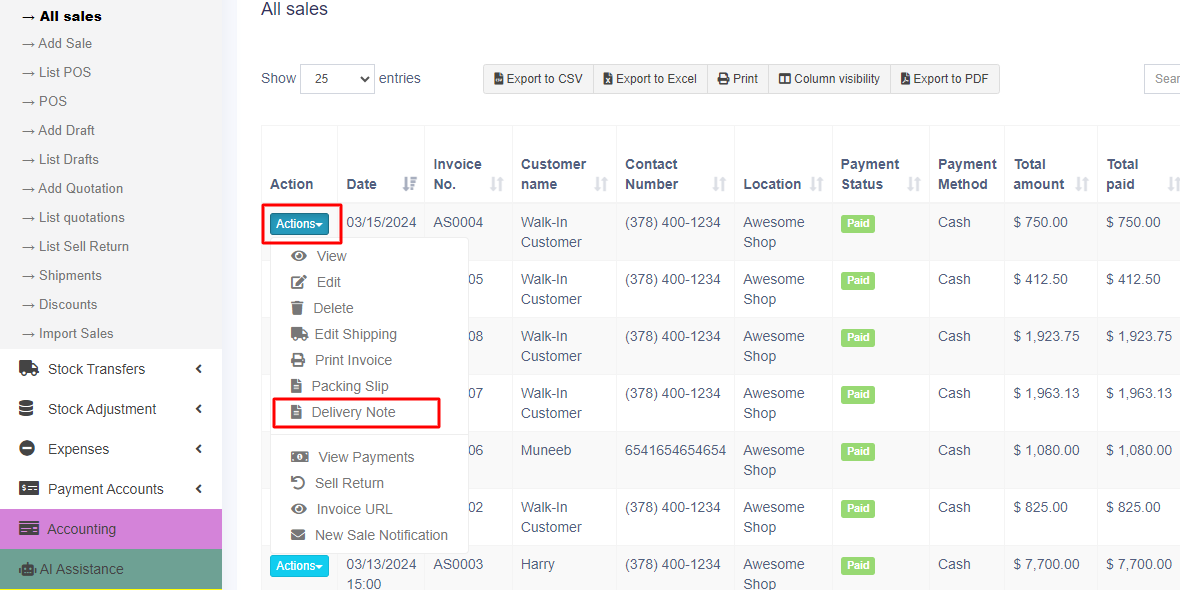
Adding Delivery Note for Sale:
How do we print the Delivery Receipt?
To add a delivery note, follow the steps below.
Step 1: While adding the sales, be sure to include shipping details (You can refer to the video guide provided below for assistance).
Step 2: Navigate to the All Sales screen and click on the Action dropdown menu for the specific sale added in Step 1.
Step 3: From the Action dropdown menu, select the ‘Delivery Note‘ option, and proceed to print the delivery note directly.
Cash Denomination
Cash denominations are usually different cash tender used in your country. With this feature, cashiers can easily calculate the total amount they have when closing the register by mentioning the number of different tended they have.
Enabling cash denomination:
- Go to business settings -> Settings
- POS tab
- Cash Denomination field, here enter the comma-separated cash denominations you’ll like to have
Using cash denomination
When a cashier closes the cash register it will ask to enter the count of each cash denomination. On entering total amount will be automatically calculated.
This count can be viewed from the Report -> Cash Register report by viewing any register.
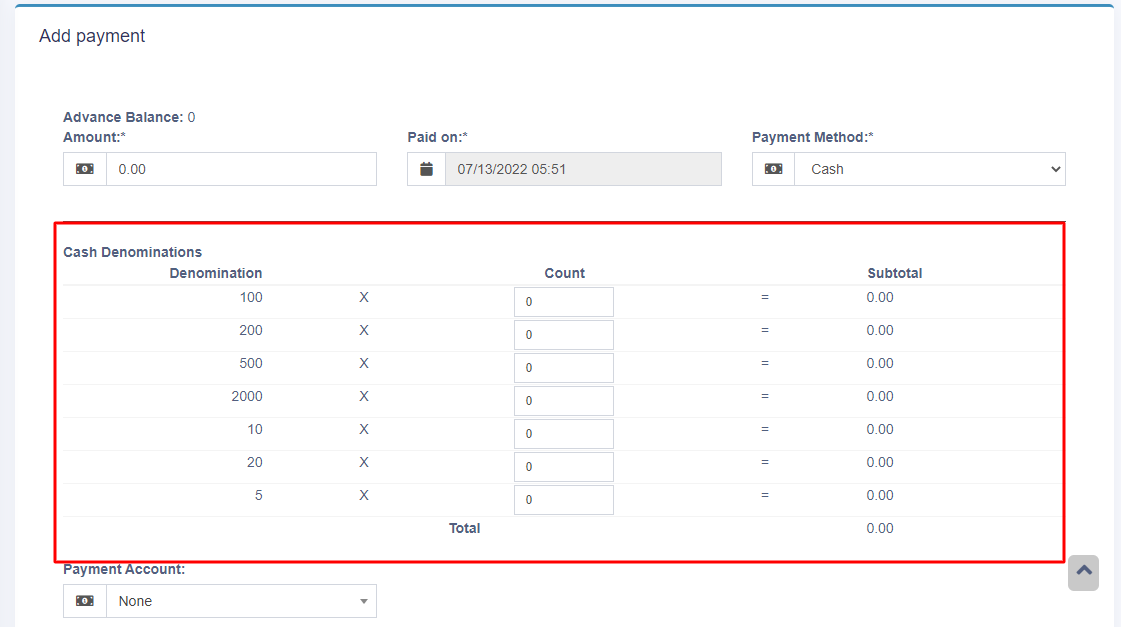
Cash denomination in Sale and Purchase:
Cash denominations can be added while making a sale or purchase. To enable this Go to Settings -> Payment.
Select the screens in which you need the cash denomination and type of payment method.

The cash denomination table will be shown while you make a sale or purchase in add sale/add purchase screen.
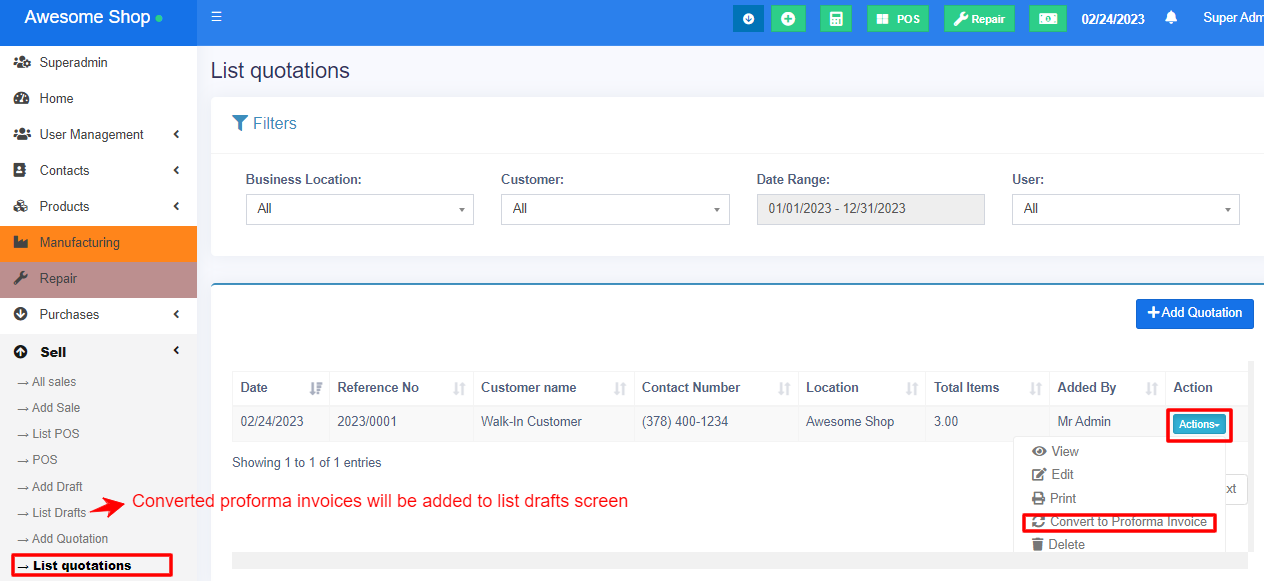
Proforma Invoice
A proforma invoice is an estimated invoice that is used to request payment from the buyer for goods or services before they are supplied.
The quotations can be converted to proforma invoices.
Select ‘Convert to proforma invoice’ from the action dropdown button on the list quotation page.
The proforma invoices will be added to the ‘list drafts’ screen. You can convert them later into actual invoices.
Import Sale
To add bulk sales to the system, you can use this feature.
Steps to import sale:
Go to Sale > Import Sale.
Click the ‘Download Template’ button to download the template file.
Once downloaded, open it and add the required details. While adding the details follow the instructions mentioned on the import sale page itself.
Save the excel file and upload it by clicking the choose file button and pressing submit button.
NOTE: It may display some error after uploading if some data added in the excel file are not as per mentioned in the instructions.
Change it accordingly and proceed.
“Group sell line by” field in import sale:
While importing an Excel file for import sale you have to select the option “Group Sell Line By“.
This field is used for the system to know which lines need to be in a single sale.
For example, if you add an Invoice_Number column in the Excel import file, then all lines from one sale will have the same Invoice_Number.
In this case, you need to select Invoice_Number option in the “Group Sell Line By” dropdown field.
“You cannot select a field twice” Issue and Solution:
You may encounter this issue while you import an Excel file using the Sale Import feature.
This issue happens when the same option name is chosen for multiple columns in the import table
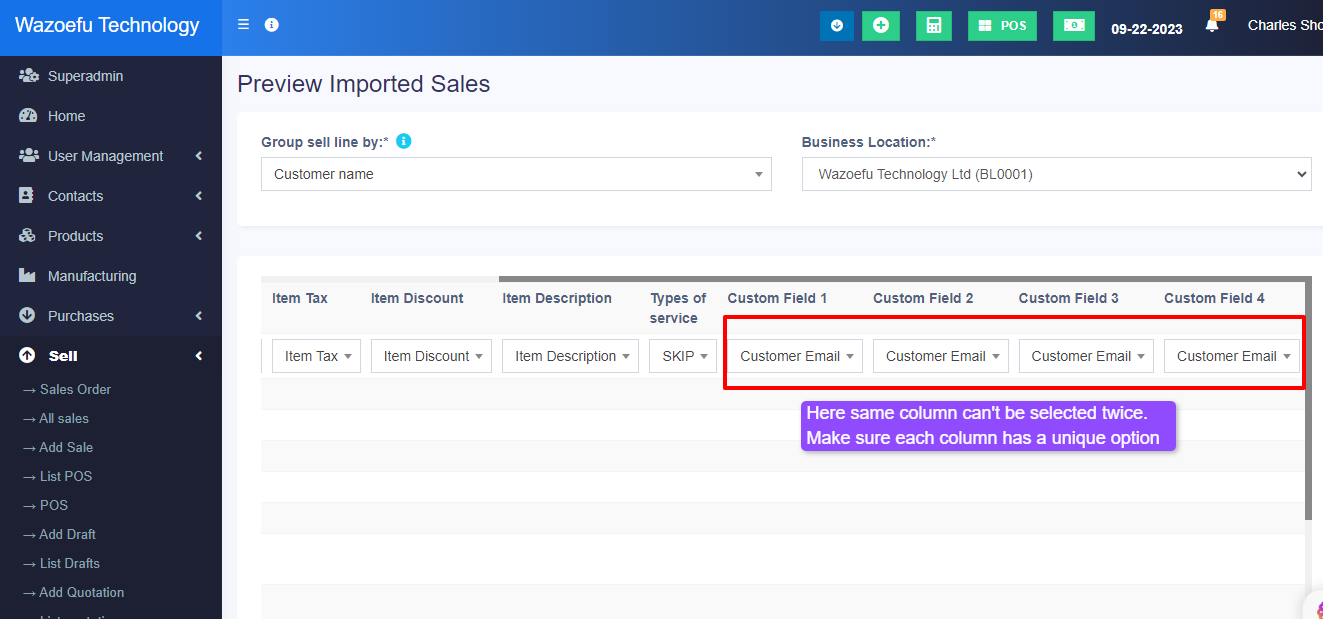
If you want to remove any column during import, you can select the SKIP option in the dropdown.
Adding Bonus or Free Items at Sale
Follow the steps below to add a free item during a sale.
- Add free items(that have an actual purchase price) during the sale by making the selling price 0 for those products.
- Include a note in the sale description indicating that these items are free, bonus, or complementary products.
- Enable the ‘sale description’ check box in the invoice layout to ensure that it is printed on the invoice (if required).
Display product unit price in POS Product suggestion:
To display product unit price in POS product suggestion follow the below steps:
Go to Business Settings > POS > Enable “Show pricing on product suggestion tooltip”
and save it.
Then in POS screen Product suggestion tooltip, it will show the product unit price